How Clownfish Survive in the Ocean’s Most Vibrant Environments
The ocean is home to some of the most vibrant and diverse ecosystems on Earth, with coral reefs standing out as true underwater cities. Among the many species that call these colorful environments home, clownfish are particularly captivating. Known for their striking orange and white stripes, clownfish are not just visually appealing but also play crucial roles within their ecosystems. This article delves into the fascinating world of clownfish, exploring their unique symbiotic relationship with sea anemones, their remarkable adaptations, diet, breeding habits, and the challenges they face due to environmental changes.
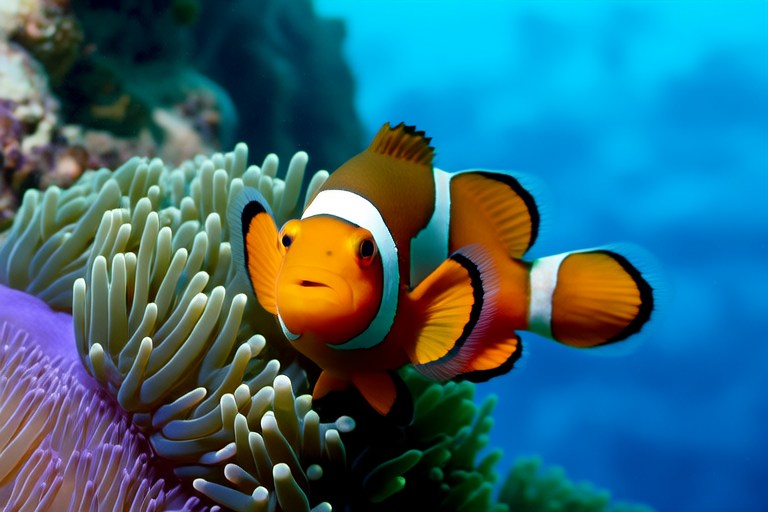
The Symbiotic Relationship with Sea Anemones
At the heart of the clownfish’s survival strategy lies its symbiotic relationship with sea anemones. This partnership is one of nature’s most remarkable examples of mutualism, where both organisms benefit from each other. Sea anemones, which resemble flowers, have stinging tentacles filled with venomous nematocysts. These tentacles are used to paralyze prey and deter predators. However, clownfish have evolved a special adaptation that allows them to live among these potentially deadly tentacles without harm.
Clownfish possess a mucus layer that coats their bodies, making them immune to the sea anemone’s toxins. This adaptation is thought to be a result of prolonged contact with the anemone over generations, leading to the development of a protective barrier. In return for protection, clownfish provide several benefits to the anemone. They help in circulating water around the anemone, bringing in fresh nutrients and oxygen. Additionally, clownfish clean the anemone by eating any dead tissue or parasites, thus keeping it healthy and vibrant.
This mutually beneficial relationship is a cornerstone of the clownfish’s survival. The anemone offers shelter from larger predators, while the clownfish ensures the anemone remains in optimal health. This dynamic duo is a prime example of how different species can coexist and thrive in harmony within the complex web of marine life.
Adaptations for Thriving in Coral Reefs
Clownfish have developed numerous adaptations that enable them to thrive in the challenging conditions of coral reefs. One of the most notable adaptations is their ability to withstand the harsh chemical environment of sea anemones. As mentioned earlier, clownfish have a specialized mucus layer that protects them from the anemone’s toxins. This adaptation is critical for their survival, as it allows them to live in close proximity to a potential predator.
Another important adaptation is their coloration. The bright orange and white stripes of clownfish serve as a warning to potential predators. This coloration is a form of aposematic signaling, indicating that the fish is toxic or dangerous. While clownfish themselves are not toxic, their close association with sea anemones may lead predators to avoid them. This visual signal helps protect the clownfish from becoming a meal for larger fish in the reef ecosystem.
Clownfish are also highly territorial. They defend their anemone homes vigorously against intruders, including other clownfish. This behavior ensures that their living space remains safe and secure. By maintaining control over their territory, clownfish can focus on feeding and reproducing without constant threats from competitors.
Diet and Feeding Habits
Clownfish are omnivorous, meaning they consume both plant and animal matter. Their diet primarily consists of algae, zooplankton, and small crustaceans. Algae provide essential nutrients, while zooplankton and crustaceans offer protein. This varied diet allows clownfish to obtain all the necessary vitamins and minerals required for their survival.
Feeding behaviors vary depending on the species and location. Some clownfish will venture away from their anemone to find food, while others remain close to their host. Regardless of their feeding strategy, clownfish have adapted to efficiently gather resources in their environment. Their small size and agility make them adept at navigating the intricate coral structures, allowing them to access food sources that might be inaccessible to larger fish.
Breeding Habits
Clownfish exhibit fascinating breeding habits that contribute to their survival in the coral reef ecosystem. Within a group of clownfish, there is typically a dominant pair that mates. This pair is responsible for producing offspring, while the rest of the group assists in caring for the young. The dominant female lays her eggs in a carefully chosen spot, usually near the base of the anemone. She then guards the eggs until they hatch, ensuring they are safe from predators.
The male clownfish plays a crucial role in the breeding process. He fertilizes the eggs and continues to guard them alongside the female. Once the eggs hatch, the newly hatched fry (baby clownfish) are independent and must fend for themselves. The parents’ role shifts to protecting the anemone and the surrounding area, ensuring the fry have a safe place to grow and develop.
Clownfish are sequential hermaphrodites, meaning they can change sex throughout their lives. If the dominant female dies, the dominant male will transform into a female, and the next largest fish in the group will become the new dominant male. This unique reproductive strategy ensures the continuation of the species even if one of the primary breeders is lost.
Challenges in a Changing Environment
Despite their remarkable adaptations and symbiotic relationships, clownfish face significant challenges due to environmental changes. One of the most pressing issues is the increasing acidity of the oceans caused by climate change. As carbon dioxide levels rise, more CO2 dissolves in seawater, lowering its pH and creating a more acidic environment. This change can interfere with the ability of clownfish larvae to detect chemical signals from their anemone hosts, potentially leading to decreased survival rates.
Coral bleaching, another consequence of rising ocean temperatures, poses a threat to clownfish. Coral reefs are vital habitats for clownfish, providing shelter and food. When corals bleach, they expel the symbiotic algae living in their tissues, turning white and often dying. Without healthy coral reefs, clownfish lose their homes and food sources, putting their populations at risk.
Human activities, such as overfishing and pollution, further exacerbate the challenges faced by clownfish. Overfishing can disrupt the balance of the reef ecosystem, removing natural predators and competitors. Pollution, especially from plastics and chemicals, can harm both clownfish and their anemone hosts, affecting their health and reproduction.
Conclusion
Clownfish are fascinating creatures that have adapted to thrive in the vibrant and challenging environments of coral reefs. Their unique symbiotic relationship with sea anemones, combined with various physical and behavioral adaptations, allows them to survive and reproduce in these complex ecosystems. Despite their resilience, clownfish face numerous challenges due to environmental changes, highlighting the importance of marine conservation efforts.
By understanding and appreciating the intricate lives of clownfish, we can better protect these remarkable creatures and the ecosystems they inhabit. Every effort towards reducing pollution, combating climate change, and preserving coral reefs contributes to the survival of clownfish and countless other marine species. Together, we can ensure that these vibrant underwater cities continue to flourish for generations to come.